

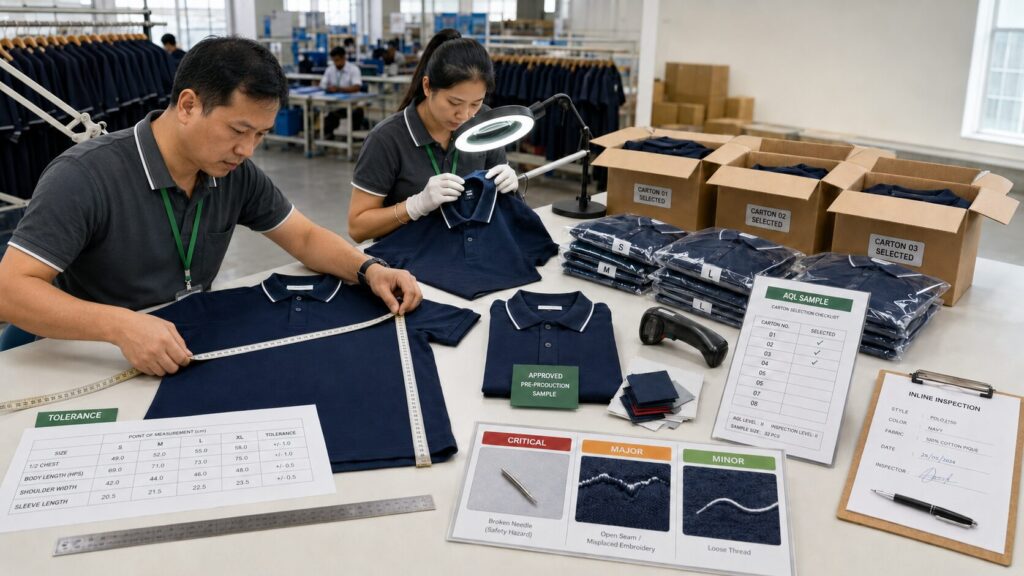
A custom clothing order does not pass inspection simply because most garments “look good.”
A reliable custom clothing quality inspection must answer three different questions:
- How many garments should be randomly inspected?
- What measurement variation is acceptable?
- Which defects are serious enough to reject the order?
These questions are controlled by three related but different tools:
- AQL sampling determines how the inspection sample is selected and how the result is evaluated.
- Measurement tolerances define the acceptable dimensional range for each point of measurement.
- Defect classification separates safety, functional and cosmetic problems into critical, major and minor categories.
Confusing these tools creates expensive misunderstandings.
AQL 2.5, for example, does not mean that exactly 2.5% defective garments are acceptable in the shipment. A measurement tolerance of ±1 cm does not mean that every part of the garment can vary by 1 cm without affecting fit. Passing a final random inspection does not prove that every garment is defect-free.
For apparel buyers, the real objective is not to chase a meaningless “zero-defect” promise. It is to establish a quality standard that is measurable, commercially realistic and consistently enforced from fabric inspection through final shipment.
What Is AQL in Garment Inspection?
AQL stands for Acceptance Quality Limit.
It is used within statistical sampling plans to make an acceptance or rejection decision about a production lot without inspecting every unit.
The current ISO 2859-1:2026 standard provides AQL-indexed single, double and multiple sampling schemes for lot-by-lot inspection. It also includes switching rules between normal, tightened, reduced and skip-lot inspection based on ongoing supplier performance. The 2026 edition replaced the previous 1999 version and its amendments. ISO 2859-1:2026
In simplified terms, the process works as follows:
- Define the inspection lot.
- Select an inspection level.
- Use the lot size and inspection level to determine a sample-size code.
- Use the code and sampling plan to determine how many units to inspect.
- Inspect randomly selected garments.
- Classify the defects found.
- Compare defect totals with the applicable acceptance and rejection numbers.
- Accept or reject the inspected lot according to the agreed plan.
The exact sample size and acceptance numbers should come from the current standard or an agreed equivalent—not from an outdated chart copied from an unrelated internet article.
AQL Is Not the Same as Defect Percentage
This is one of the most common misunderstandings in apparel sourcing.
If a buyer specifies AQL 2.5 for major defects, it does not mean:
“The factory is allowed to ship exactly 2.5% major-defective garments.”
The AQL is an indexing value used to select an acceptance-sampling plan. The plan creates a statistical decision rule for the sample.
A shipment can pass while still containing some defects. It can also fail because the inspected sample exceeds the rejection threshold even though the exact defect rate of the entire lot remains unknown.
AQL is therefore a lot-acceptance tool—not a guarantee that the shipment contains a particular percentage of defective garments.
AQL Does Not Replace Quality Requirements
An AQL plan tells the inspector how to make a decision after counting defects. It does not define:
- What the garment should look like
- Which measurements are correct
- What counts as a defect
- Whether a defect is critical, major or minor
- How color should be evaluated
- Which performance tests are required
- Whether the fabric is correct
- Whether the shipment complies with legal requirements
Those requirements must come from the buyer’s tech pack, approved sample, measurement chart, testing plan and defect-classification guide.
Common Apparel AQL Levels
Apparel buyers often use different AQL values for different defect classes.
A frequently used commercial starting point is:
| Defect class | Example inspection requirement |
|---|---|
| Critical defects | No critical defects accepted in the inspected sample |
| Major defects | AQL 2.5 |
| Minor defects | AQL 4.0 |
Other buyers may apply stricter requirements, such as:
- Major defects: AQL 1.5
- Minor defects: AQL 2.5
- Tighter standards for premium retail programs
- Separate requirements for safety-critical products
- Customer-specific plans for uniforms, children’s garments or specialized apparel
These values are not universal apparel laws.
The correct plan depends on:
- Product risk
- Retail positioning
- End use
- Order value
- Supplier history
- Buyer requirements
- Regulatory exposure
- Cost of field failure
- Inspection economics
A promotional T-shirt used for a short event may not require the same cosmetic standard as a luxury polo shirt. A post-surgery garment or children’s product may require tighter safety and functional controls than ordinary casualwear.
What Does “Zero Critical Defects” Actually Mean?
Buyers frequently write “Critical AQL 0.”
This wording can be misleading because sampling inspection cannot mathematically prove that a shipment contains zero critical defects unless every unit is examined—and even 100% inspection is subject to human error.
A clearer contractual rule is:
No critical defects are accepted in the inspected sample. Discovery of one critical defect results in rejection or escalation according to the agreed quality plan.
This is a strict sample-acceptance rule. It is not a statistical guarantee that no undetected critical defect exists elsewhere in the shipment.
Understanding Lot Size, Inspection Level and Sample Size
AQL inspection begins with a clearly defined lot.
A lot is the group of units being considered together for the acceptance decision.
For custom apparel, a lot may consist of:
- One style and one purchase order
- One style across several colors
- One production batch
- One delivery installment
- One factory’s output during a defined period
Buyers should not combine unrelated garments into one lot simply to reduce inspection effort.
For example, polo shirts, hoodies and sports shorts may have different fabrics, production lines, constructions and risks. Pooling them can allow defects in one product to be statistically diluted by acceptable units from another.
General Inspection Levels
AQL systems use inspection levels to determine the relationship between lot size and sample size.
Commercial apparel inspections often begin with a general inspection level, with General Inspection Level II commonly used as a practical starting point. However, it should not be treated as an automatic rule for every order.
A higher inspection level produces a larger sample and more inspection effort. A lower level produces a smaller sample but also less information about the lot.
The buyer should define the inspection level in advance based on risk, supplier history and product complexity.
Special Inspection Levels
Special inspection levels may be used for tests that are:
- Time-consuming
- Destructive
- Expensive
- Technically specialized
- Impractical to perform on every garment in the main sample
Examples may include:
- Seam-strength tests
- Fabric-weight checks
- Colorfastness tests
- Zipper strength
- Button pull tests
- Wash testing
- Needle-detection verification
The workmanship sample, measurement sample and functional-test sample do not always need to contain the same number of garments.
This must be stated in the inspection plan. Buyers should not assume that every garment in the AQL workmanship sample will receive a complete measurement or laboratory test.
Random Selection Matters as Much as Sample Size
A statistically calculated sample is only meaningful when the garments are selected representatively.
Inspectors should avoid allowing the factory to prepare a special group of “inspection pieces.”
Selection should cover:
- Different cartons
- Different packing positions
- All important colors
- Multiple sizes
- Different production dates or lines where relevant
- Early, middle and late production output
- Different carton locations within the storage area
If an order contains 80% black garments and 20% white garments, the sample should not consist almost entirely of black units. If extended sizes use a separate cutting marker or sewing adjustment, those sizes deserve representation.
A biased sample cannot be repaired by using an AQL chart correctly.
AQL Counts Defects—but Buyers Must Define What Is Counted
Inspection plans must distinguish between:
- A defect: One individual nonconformity
- A defective unit: A garment containing one or more defects
A single polo shirt might contain:
- One open seam
- One stain
- Incorrect logo placement
- A missing size label
That is four defects on one defective garment.
The inspection procedure must state whether the acceptance decision is based primarily on defect counts, defective units or another agreed method. Otherwise, factories, buyers and third-party inspectors may report the same findings differently.
Critical, Major and Minor Garment Defects
Defect classification determines how inspection findings affect the final decision.
The classification should consider:
- Safety
- Legal compliance
- Product function
- Wearability
- Saleability
- Visibility
- Repairability
- Extent of the problem
- Likelihood of customer return
- Potential damage to the buyer’s brand
The same physical issue may receive different classifications depending on its location, size and end use.
A small oil mark inside a seam allowance may be minor or irrelevant. The same mark in the center of a white polo shirt may be major because the garment cannot be sold as first quality.
Critical Defects
A critical defect presents an unacceptable safety, legal or serious functional risk.
Potential apparel examples include:
- Broken needle or sharp metal fragment in the garment
- Exposed sharp component
- Unsafe fastening that creates a foreseeable injury risk
- Serious contamination
- Hazardous component prohibited for the target market
- Missing safety warning where legally required
- Incorrect safety-related labeling
- Children’s garment feature presenting an unacceptable entanglement or choking risk
- Product construction that makes the garment unsafe for its intended specialized use
Critical classifications should be product-specific.
An ordinary loose button may be a major workmanship problem on adult corporate apparel. On clothing intended for very young children, the same component may require a more serious safety assessment.
Major Defects
A major defect is likely to affect function, fit, durability, appearance or commercial saleability.
Examples may include:
- Hole, tear or open seam
- Broken zipper or unusable fastening
- Garment measurement outside the agreed tolerance
- Incorrect size label
- Wrong fabric or color
- Obvious shade variation
- Major stain or oil mark
- Missing logo
- Incorrect print or embroidery
- Noticeably misplaced decoration
- Serious seam puckering
- Twisted side seam
- Incorrect garment construction
- Missing required component
- Incorrect assortment
- Severe collar distortion
- Packaging error that prevents retail or fulfillment processing
A major defect usually causes a customer to reject, return or complain about the garment.
Minor Defects
A minor defect does not significantly affect safety, function or saleability but falls below the agreed workmanship standard.
Examples may include:
- Small loose thread
- Slightly uneven stitching in a low-visibility area
- Minor seam waviness
- Small, repairable finishing issue
- Minor print imperfection outside the focal area
- Slight inconsistency that does not affect fit
- Small packaging presentation issue
- Slightly uneven label stitching
Minor does not mean irrelevant.
A repeated minor defect can indicate poor process control. A large number of loose threads, for example, may not make individual garments unusable, but it can create significant rework and a poor customer experience across the order.
How to Build a Garment Defect Classification Guide
Relying only on verbal descriptions produces inconsistent inspection decisions.
A buyer-specific defect guide should include:
- Defect name
- Product area
- Written definition
- Critical, major or minor classification
- Size threshold
- Location or visibility zone
- Reference photograph
- Repairability
- Applicable style or product group
A practical classification matrix might look like this:
| Defect | Condition | Suggested classification |
|---|---|---|
| Open seam | Structural seam open or likely to fail | Major |
| Broken needle fragment | Any sharp fragment detected | Critical |
| Stain | Clearly visible on primary external area | Major |
| Stain | Very small and removable in hidden area | Minor |
| Logo misplacement | Beyond agreed placement tolerance | Major |
| Loose thread | Small and easily trimmed | Minor |
| Wrong size label | Label does not match garment | Major |
| Missing safety label | Required for safe or legal use | Critical or major, depending on requirement |
These classifications are examples. The final guide should reflect the specific product, market and buyer requirements.
Use Garment Visibility Zones
Defect severity can change according to location.
Buyers may divide a garment into zones:
- Zone A: Highly visible areas such as center front, upper chest and collar
- Zone B: Secondary visible areas such as sleeves, side body and back
- Zone C: Less visible internal areas
A small slub, stain or stitch irregularity may be major in Zone A but minor in Zone C.
The inspection manual should define these zones visually. Inspectors should not be expected to interpret “highly visible” differently from one order to another.
Garment Measurement Tolerances Explained
A garment measurement tolerance is the permitted variation from the specified measurement.
If the approved half-chest measurement is 54 cm with a tolerance of ±1 cm, an inspected garment may measure between 53 cm and 55 cm for that point of measurement.
However, tolerances should not be copied blindly across the entire garment.
Different measurements have different effects on fit:
- Chest width affects overall ease
- Shoulder width affects balance and sleeve position
- Neck opening affects comfort and appearance
- Sleeve opening affects mobility and silhouette
- Body length affects coverage and styling
- Collar dimensions affect structure
- Pocket position affects visual balance
- Elastic length affects function
A reasonable tolerance for body length may be unacceptable for a small collar dimension or logo placement.
Measurement Tolerance Is Not AQL
These are separate concepts.
The measurement tolerance defines whether an individual measurement conforms to specification.
The AQL plan determines how many nonconforming units or defects in the sample trigger acceptance or rejection.
For example:
- Specification: Half-chest 54 cm ±1 cm
- Inspected result: 55.4 cm
- Conclusion: Measurement is outside tolerance
- Defect classification: Major, if that is what the buyer’s quality manual specifies
- AQL treatment: Count the affected garment under the agreed major-defect rule
Without an agreed tolerance, the inspector cannot determine whether 55.4 cm is acceptable. Without defect classification and an AQL plan, the inspector cannot determine how that finding affects the lot decision.
How to Establish Realistic Measurement Tolerances
Garment tolerances should be based on:
- Fabric type
- Stretch and recovery
- Knit or woven construction
- Garment dimensions
- Manufacturing method
- Washing or finishing process
- Measurement repeatability
- Fit sensitivity
- Product category
- Buyer positioning
A rigid woven shirt may require different control from a stretch sports top. A fitted compression garment may require tighter functional tolerances than an oversized cotton T-shirt.
Example Measurement Table
The following is illustrative rather than a universal apparel standard:
| Point of measurement | Specification | Example tolerance |
|---|---|---|
| Half chest | 54 cm | ±1.0 cm |
| Body length | 72 cm | ±1.0 cm |
| Shoulder width | 46 cm | ±0.7 cm |
| Sleeve length | 22 cm | ±0.7 cm |
| Sleeve opening | 17 cm | ±0.5 cm |
| Collar width | 7 cm | ±0.3 cm |
| Logo placement | 8 cm from defined reference | ±0.5 cm |
The buyer and pattern team should approve the actual tolerance for each product.
Define the Measurement Method
A tolerance is meaningless without a repeatable point-of-measurement method.
The tech pack should show:
- Where measurement begins
- Where it ends
- Whether the tape follows a curve
- Whether the garment is laid flat
- Whether seams are included
- Whether fabric is relaxed
- Whether the measurement is taken before or after washing
- Whether buttons or zippers are closed
- Whether elastic is relaxed or extended
- How the garment is conditioned before measurement
“Measure chest” is not sufficient.
A better instruction is:
Measure straight across the garment, 2.5 cm below the armhole seam, with the garment laid flat and fabric relaxed without stretching.
Measurement Repeatability Matters
Two trained inspectors can obtain different results if:
- The garment is not laid out consistently
- The fabric is stretched
- Wrinkles are not smoothed in the same way
- The tape is angled
- Curved measurements are handled differently
- The measurement point is not clearly marked
- Elastic components are under different tension
For borderline results, the quality procedure should define whether the garment is remeasured and who makes the final decision.
Watch for Tolerance Stacking
A garment can have several measurements individually within tolerance and still fit poorly.
For example:
- Shoulder width is at the maximum tolerance
- Chest width is at the minimum tolerance
- Armhole depth is at the minimum tolerance
- Sleeve opening is at the minimum tolerance
Each point may technically pass, but together they can create an uncomfortable or visually unbalanced garment.
Quality inspection should therefore include both:
- Measurement conformity
- Comparison with the approved fit and pre-production sample
A ruler cannot replace fit judgment.
Before-Wash Tolerance and After-Wash Shrinkage Are Different
Finished-garment measurements before washing and dimensional change after laundering should be controlled separately.
A garment may measure correctly before washing but shrink beyond the approved limit after laundering. It may also have acceptable length shrinkage but develop side-seam twist or surface distortion.
The testing plan should state:
- Washing method
- Water temperature
- Detergent
- Wash cycle
- Drying procedure
- Number of cycles
- Measurement points
- Permitted dimensional change
- Appearance criteria
AATCC TM150-2025 addresses dimensional changes of garments after home laundering, while ISO 5077:2007 provides a method for determining dimensional change after specified washing and drying procedures. AATCC TM150-2025, ISO 5077:2007
Use the testing method required by the target market, retailer or buyer specification. Do not combine results from different wash and drying conditions as though they were equivalent.
Main Defect Categories in Custom Clothing Inspection
A comprehensive inspection should look beyond sewing defects.
Fabric and material defects
- Holes
- Knitting lines
- Weaving faults
- Slubs beyond the approved standard
- Shade variation
- Wrong GSM
- Wrong composition
- Pilling
- Contamination
- Uneven finishing
Cutting defects
- Incorrect panel dimensions
- Off-grain cutting
- Poor pattern alignment
- Notches missing or misplaced
- Distorted panels
- Mismatched stripes or checks
- Incorrect cutting direction
Sewing defects
- Open seams
- Broken stitches
- Skipped stitches
- Uneven stitch density
- Seam puckering
- Raw edges
- Incorrect seam type
- Poor back-tacking
- Untrimmed threads
- Needle damage
ASTM D6193-16(2025) covers the requirements and characteristics of stitches and seams used in sewn-product fabrication and can support consistent technical terminology. ASTM D6193-16(2025)
Measurement and fit defects
- Measurement outside tolerance
- Incorrect grading
- Uneven left and right sides
- Twisted garment
- Incorrect balance
- Poor sleeve pitch
- Collar distortion
- Incorrect pocket position
Printing and embroidery defects
- Wrong artwork
- Incorrect color
- Misplacement
- Poor registration
- Ink bleeding
- Cracking
- Peeling
- Uneven embroidery density
- Thread breaks
- Fabric puckering
- Incorrect backing
Trim and component defects
- Broken zipper
- Loose button
- Incorrect snap
- Drawcord mismatch
- Weak elastic
- Wrong thread color
- Missing component
- Incorrect rib or binding
Label and packaging defects
- Wrong size label
- Incorrect care information
- Missing country-of-origin information
- Wrong barcode
- Incorrect price ticket
- Poor folding
- Wrong carton assortment
- Missing polybag warning
- Incorrect shipping marks
- Damaged retail packaging
Why Final Inspection Alone Is Not Enough
A final random inspection is a decision point—not a complete quality-management system.
By the time the finished order is packed, many defects are expensive to correct.
A stronger custom clothing quality-control process includes several gates.
1. Incoming material inspection
Check:
- Fabric identity
- Color
- Shade continuity
- Width
- Weight
- Visible faults
- Shrinkage
- Trims and labels
2. Pre-production verification
Confirm:
- Approved pattern
- Approved size chart
- Final bill of materials
- Approved PP sample
- Artwork
- Labels
- Packaging
- Inspection criteria
3. Cutting and first-output inspection
Check:
- Marker and pattern version
- Fabric relaxation
- Panel measurements
- Bundle control
- First completed garments
- Production-line interpretation
4. Inline inspection
Inspect work while production is underway.
Inline inspection can identify:
- Repeated sewing defects
- Measurement drift
- Print-placement problems
- Operator inconsistency
- Incorrect components
- Process-control failures
Correcting a problem after 200 garments is usually easier than correcting it after 5,000 garments.
5. Final random inspection
Evaluate the completed lot against:
- Workmanship standard
- AQL plan
- Measurement tolerances
- Approved sample
- Packaging specification
- Quantity and assortment
- Functional checks
6. Shipment and loading verification
Where required, confirm:
- Carton count
- Shipping marks
- Container condition
- Loading quantity
- Product and carton identity
- Loading photographs
- Seal number
What Happens When a Garment Order Fails Inspection?
A failed inspection should not automatically lead to a cosmetic replacement of only the defective sample pieces.
The buyer and factory should determine:
- What caused the failure?
- Is it isolated or systematic?
- Which production period, line, color or size is affected?
- Can the defect be repaired?
- Is 100% screening required?
- Must the lot be reworked or reproduced?
- What evidence is required before reinspection?
- Which party pays for corrective action and reinspection?
A typical corrective workflow may include:
- Quarantine the affected lot
- Analyze the defect pattern
- Identify root cause
- Define containment scope
- Rework or replace affected products
- Conduct factory-level screening
- Submit corrective evidence
- Perform reinspection according to the agreed rule
- Update the process to prevent recurrence
Replacing only the defects found in the original sample does not address undetected defects elsewhere in the lot.
What Should a Garment Inspection Report Include?
A useful report should show more than “Pass” or “Fail.”
It should include:
- Buyer and supplier
- Purchase order
- Style number
- Product description
- Order quantity
- Lot definition
- Production and packing status
- Inspection date and location
- Sampling standard and version
- Inspection level
- AQL values
- Sample size
- Selection method
- Sample distribution by color and size
- Critical, major and minor defect totals
- Defect photographs
- Measurement results
- Functional-test results
- Packaging findings
- Quantity verification
- Comparison with approved sample
- Final conclusion
- Corrective-action requirement
The report should also disclose any limitations.
For example:
- Some cartons were inaccessible
- Testing equipment was unavailable
- Production was incomplete
- Approved samples were not provided
- Labels were not final
- Measurement sample was smaller than the workmanship sample
These limitations affect how much confidence the buyer can place in the inspection result.
Example: Inspecting a Custom Polo Shirt Order
Consider an order of custom corporate polo shirts in three colors and six sizes.
Step 1: Define the lot
Confirm whether all colors belong to one inspection lot or whether differences in fabric, dyeing or production timing require separate treatment.
Step 2: Confirm the quality standard
The inspector receives:
- Final tech pack
- Approved PP sample
- Measurement chart
- Tolerance table
- Artwork
- Label files
- Packaging specification
- Defect-classification guide
- AQL and inspection-level instructions
Step 3: Select samples
Garments are selected across:
- Multiple cartons
- All three colors
- Representative sizes
- Different packing positions
- Relevant production batches
Step 4: Inspect workmanship
The inspector checks:
- Fabric shade
- Collar and placket
- Stitching
- Side seams
- Embroidery
- Buttons
- Labels
- Cleanliness
- Overall appearance
Step 5: Conduct measurement checks
The defined measurement sample is evaluated using the approved point-of-measurement method and tolerances.
Step 6: Perform functional checks
Depending on the specification, these may include:
- Button attachment
- Placket function
- Seam security
- Label adhesion
- Packaging barcode scanning
Step 7: Classify defects
Every finding is classified as critical, major or minor according to the approved defect guide.
Step 8: Make the lot decision
The totals are compared with the applicable acceptance and rejection criteria.
If one sharp metal fragment is discovered, the lot may fail under the critical-defect rule even when major and minor counts remain below their rejection thresholds.
Ten Mistakes Buyers Make with Apparel AQL Inspection
1. Treating AQL 2.5 as a 2.5% defect allowance
AQL is an index used within a sampling plan, not a direct shipment-defect percentage.
2. Using an outdated AQL table
ISO 2859-1:1999 has been replaced by ISO 2859-1:2026.
3. Failing to define the lot
Unrelated styles or production batches should not be combined without a justified plan.
4. Allowing the factory to prepare inspection samples
The inspector should control representative sample selection.
5. Using AQL without a defect guide
The counting system is useless if nobody agrees on what constitutes a major or minor defect.
6. Applying one tolerance to every measurement
Fit-sensitive and small measurements may require different limits.
7. Measuring without a defined method
Different measurement techniques produce different results.
8. Checking workmanship but not measurements
A visually clean garment may still have serious fit and sizing problems.
9. Treating a passed sample as proof of a perfect shipment
Sampling controls risk; it does not inspect every garment.
10. Inspecting only after everything is packed
Systematic problems should be identified during materials, cutting, first output and inline production.
Buyer’s Custom Clothing Quality Inspection Checklist
Before production begins, confirm that the following documents are approved:
- Final tech pack
- Bill of materials
- Color standard
- Approved PP sample
- Measurement chart
- Point-of-measurement diagrams
- Measurement tolerances
- Defect-classification guide
- Visibility-zone guide
- AQL values
- Inspection levels
- Lot definition
- Measurement sample size
- Functional-test plan
- Packaging specification
- Final inspection readiness criteria
- Failure and reinspection procedure
- Authorized decision maker
If any item remains undefined, mark it clearly as unresolved rather than allowing an inspector or factory to make an invisible assumption.
Frequently Asked Questions
What AQL level is normally used for clothing?
Many commercial apparel programs use AQL 2.5 for major defects and AQL 4.0 for minor defects as a starting point. However, these are not universal requirements. The correct levels depend on product risk, retail positioning, customer requirements and supplier performance.
Does passing AQL inspection mean the shipment is defect-free?
No. AQL is a statistical lot-acceptance method based on a sample. Passing means the inspected sample met the agreed acceptance criteria. It does not prove that every unit in the shipment is free from defects.
Is AQL 1.5 stricter than AQL 2.5?
Generally, yes. Under otherwise equivalent sampling conditions, a lower AQL value represents a stricter acceptance requirement. The complete sampling plan, inspection level and defect classification must still be specified.
Is AQL used for garment measurements?
AQL may be used to make a lot decision after measurement failures are identified, but it does not define the measurement tolerance itself. The buyer must provide the measurement specification and permitted tolerance for every relevant point.
Is one measurement tolerance suitable for all garments?
No. Tolerances should reflect fabric behavior, garment construction, measurement size, manufacturing capability and fit sensitivity.
What is the difference between a major and minor defect?
A major defect is likely to affect function, fit, durability, appearance or saleability. A minor defect falls below the agreed workmanship standard but does not significantly affect normal use or commercial acceptance.
Can a buyer require zero defects?
A buyer can establish strict acceptance criteria and require corrective action. However, sampling inspection cannot prove that an entire lot contains zero defects. Critical risks may require additional controls, including process prevention, needle control, metal detection or 100% screening.
Should every garment be measured during inspection?
Not necessarily. The measurement sample may be smaller than the workmanship sample because complete measurement is time-consuming. The measurement sampling plan should be defined before inspection.
Conclusion: AQL Works Only When the Quality Standard Is Clear
Custom clothing quality inspection is not simply a matter of opening cartons and counting visible defects.
A reliable system requires three connected decisions:
- AQL sampling determines how the lot is evaluated.
- Measurement tolerances determine whether garment dimensions conform.
- Defect classification determines the seriousness of each finding.
None of these tools works properly in isolation.
AQL without a defect guide produces inconsistent counting. Measurement tolerances without defined measurement methods produce disputes. Final inspection without material and inline controls identifies problems too late.
The strongest apparel quality plans start before cutting begins. They connect the tech pack, approved pre-production sample, measurement chart, defect manual, inspection plan and corrective-action procedure into one consistent production standard.
Founded in Shenzhen in 1999, LSLONG Garments provides custom T-shirt, polo shirt, hoodie, sportswear and corporate apparel manufacturing services. LSLONG can work with buyers to define product specifications, measurement standards, sample approvals, packaging requirements and inspection criteria before bulk production.
Define the standard before production. Control the process during manufacturing. Inspect the shipment against what was actually approved.